
This post is part of my video blog and you can find more information about this video on this show’s homepage which is here.
You can support this channel on Patreon: patreon.com/JohnElliotV
Silly Job Title: Electron Herder
This video is a teardown of the ALKOY Capacitor Discharge Pen which I did for YouTube user t1d100 who asked me about it over here: Demo of the ALKOY Capacitor Discharge Pen | In The Lab With Jay Jay.
I made a bunch of mistakes while making this video, so please bear with me. I tried to add some captions to explain things when I went wrong.
The discharge pen that I have was purchased from Amazon Australia here: 1000V Portable Capacitor Discharge Pen High Voltage Quick Discharging Tool Constant Discharge Pen Electronic Repairs Discharge Pen ALKOY.
There seems to be a similar product available from Amazon USA here: YEKMLCO Capacitor Discharge Pen Fast Discharging High Voltage 1000V Repair Tool Discharger for Electronic Safety Intelligent (affiliate link).
In the video you can watch me break this thing open. I didn’t exactly know how to do it, and I permanently damaged the device while opening it. In the end I wasn’t 100% sure what the safe and proper way to open these things really is. Giving it a mighty pull might work, otherwise you will need to leverage off some friction locks.
Before I broke the device open I tried to measure the resistance across its probes, but all three measurement devices reported open circuit. The device doesn’t seem to engage the resistor until it detects a voltage.
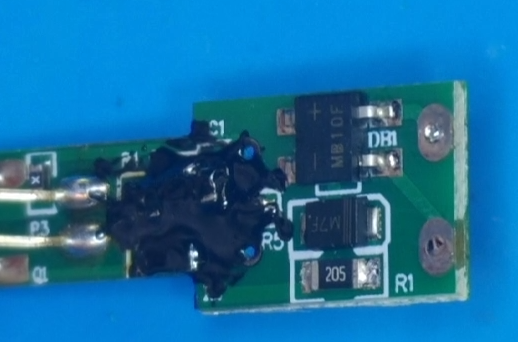
Eventually I got the device open, you can see some photos of the circuit board below, and I make some attempt to identify the components.
The MB10F on the top is a bridge rectifier, the M7F in the middle is a rectifying diode, and the resistor at the bottom is 2MΩ. In the video I say that the resistor is a “two ohm resistor”, but it is actually a “two MEGA ohm resistor” (I knew that, I just misspoke).
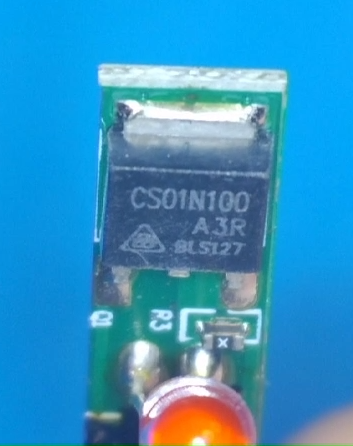
I’m not 100% sure what the CS01N100 A3R is, but it seems than an CS01N100 A4R is a silicon N-Channel Power MOSFET, so I think that’s probably what that is.
As I broke this device during the teardown I have purchased myself a replacement device for AU$23.02.
In the video I use the following equipment (affiliate links where possible):
In the video I have trouble with the connections into the DSO-TC3, the connections are documented here: FNIRSI DSO-TC3.
Thanks very much for watching! And please remember to hit like and subscribe!
Following is a product I use picked at random from my collection which may appear in my videos. Clicking through on this to find and click on the green affiliate links before purchasing from eBay or AliExpress is a great way to support the channel at no cost to you. Thanks!
Yum Cha 52 in 1 Tiger Wrench notes notes |
Let’s go shopping!