When calculating parallel resistances it is the conductances that add:
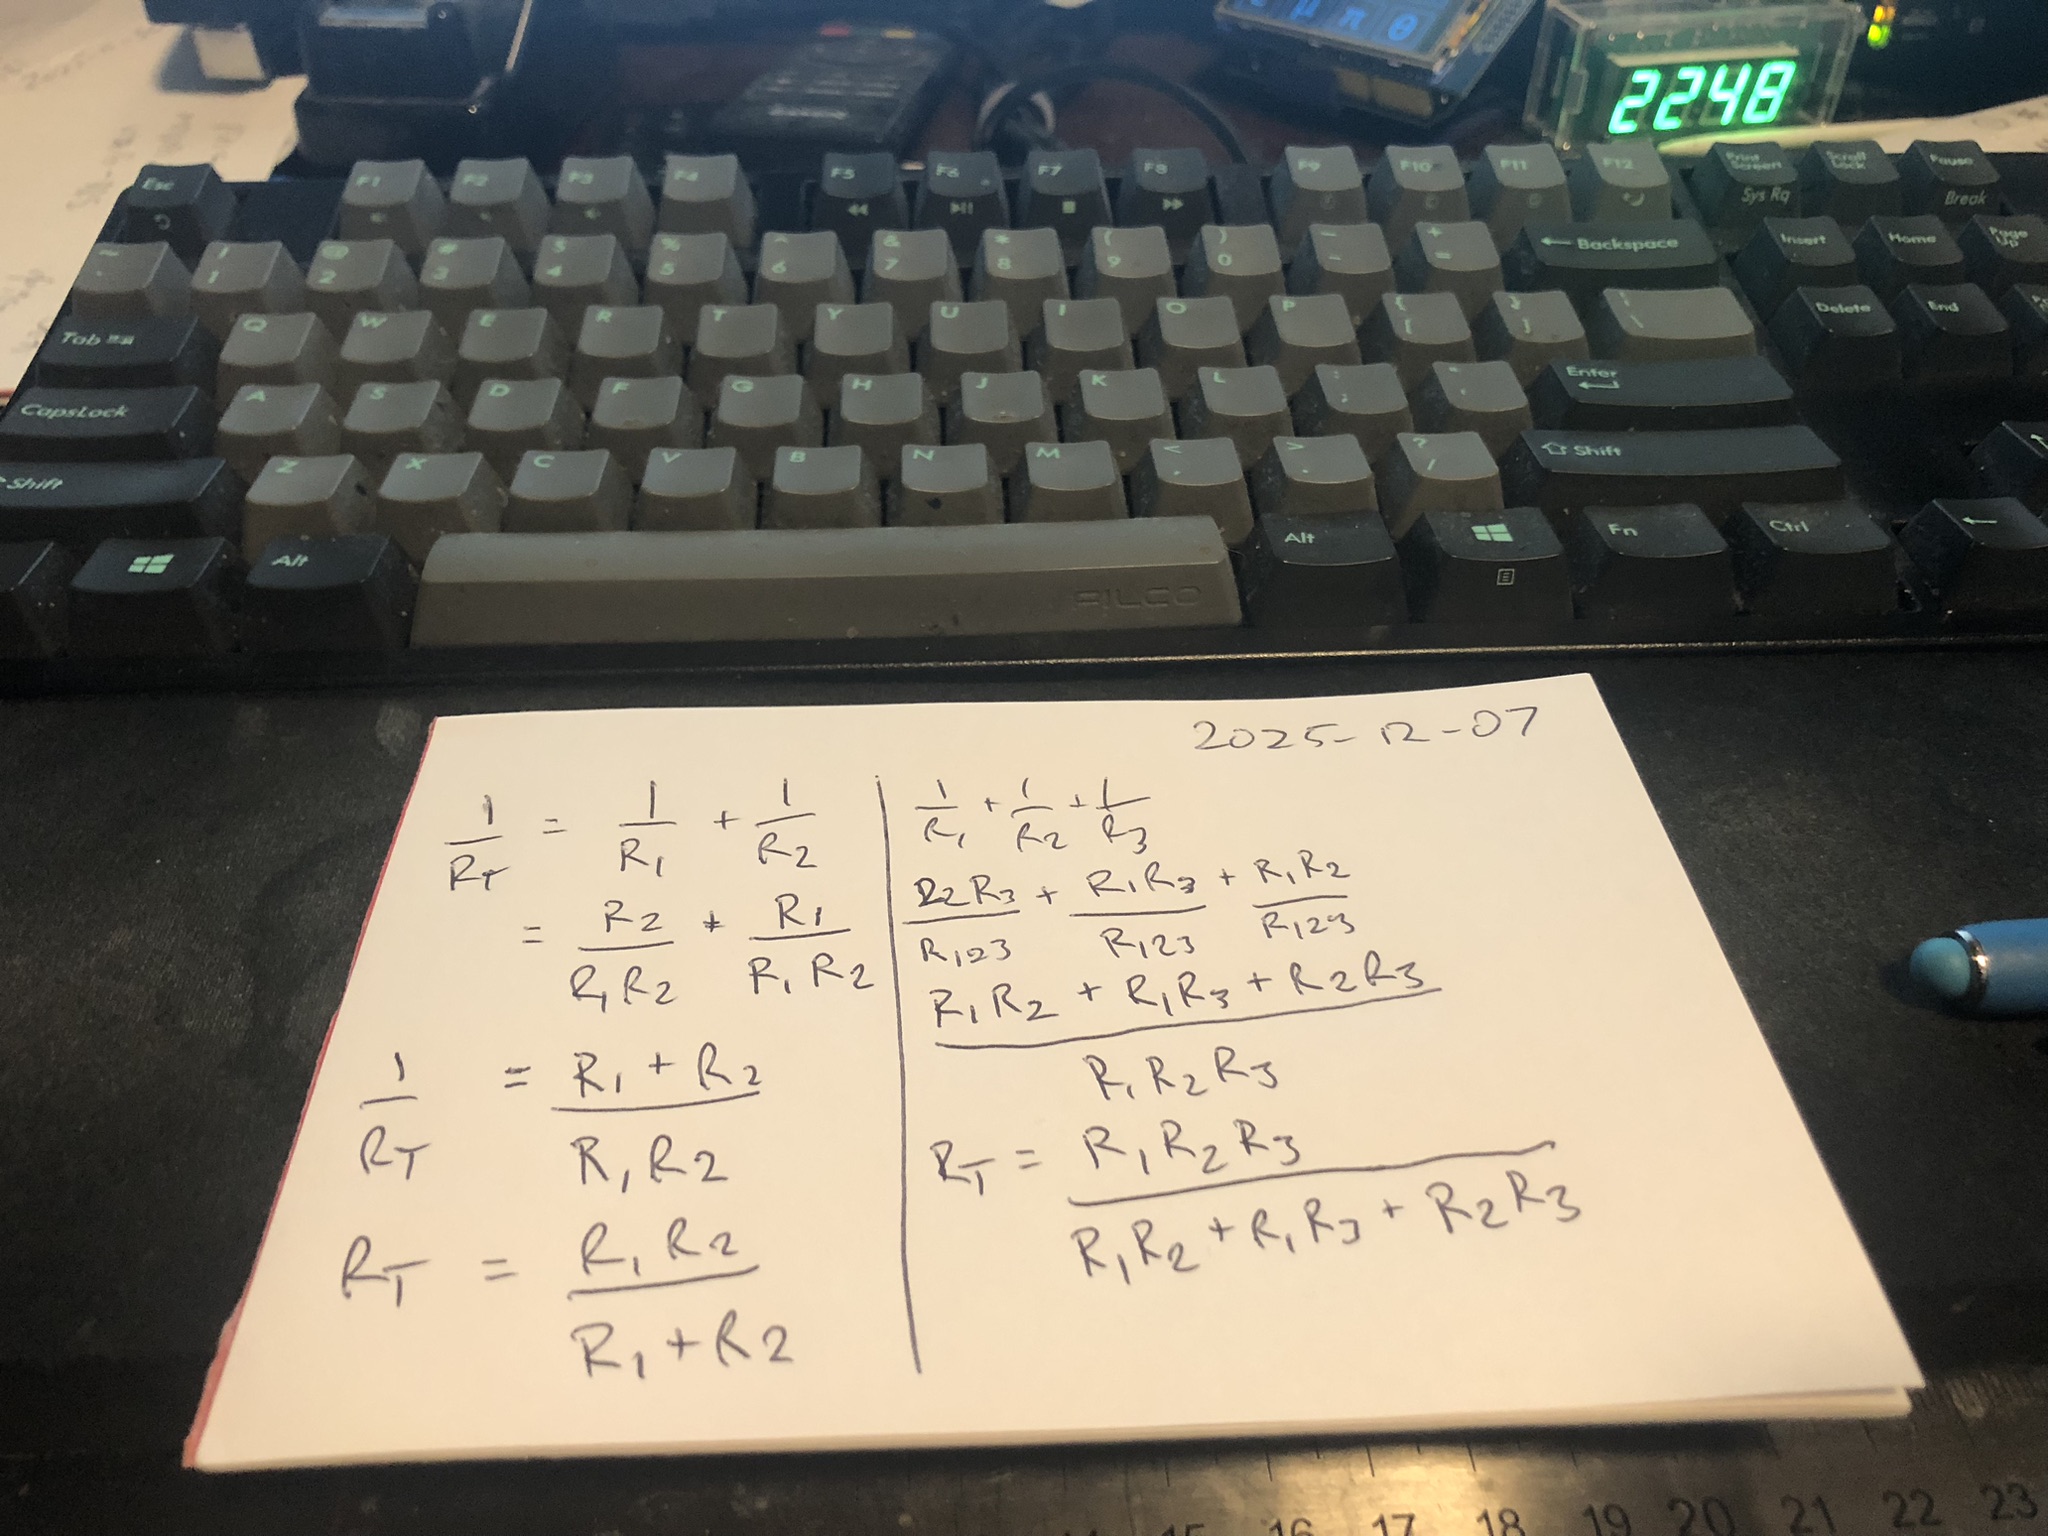

When calculating parallel resistances it is the conductances that add:
Today I watched Single Transistor Blinker: The Magic of Negative Resistance. It recommends the book Troubleshooting Analog Circuits.
This post is part of my video blog and you can find more information about this video over here.
You can support this channel on Patreon: patreon.com/JohnElliotV
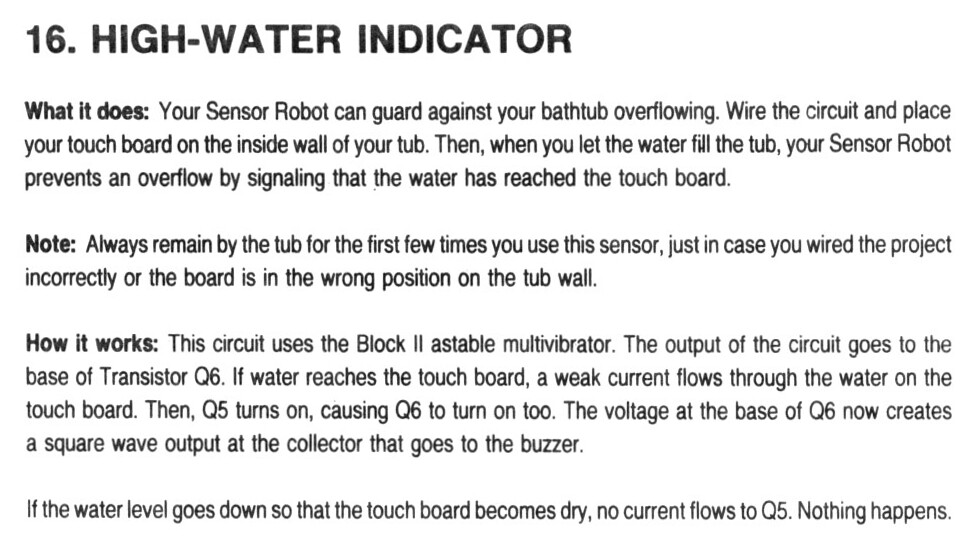
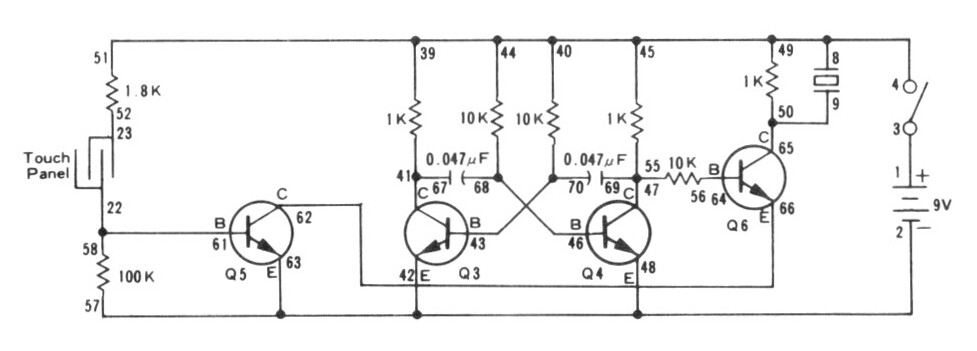
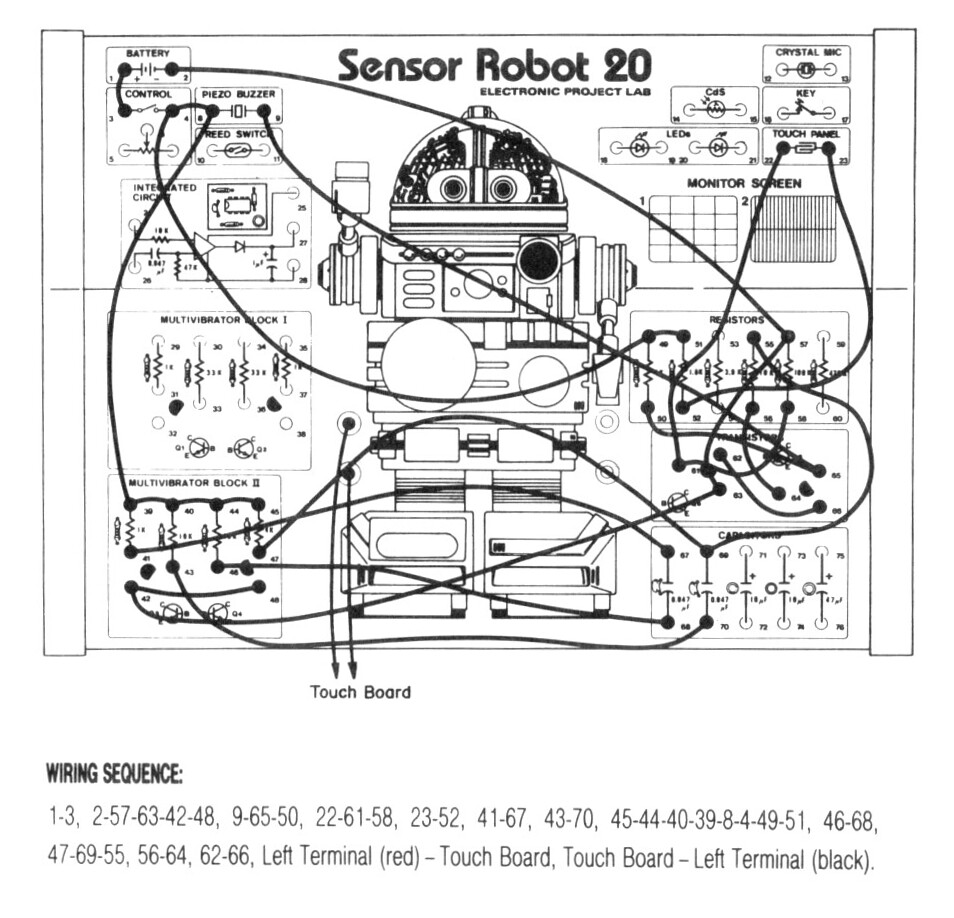
In this video we do the 16th project from the Maxitronix Sensor Robot 20 (20in1) Electronics Project Lab Kit: High-Water Indicator.
After we build the circuit we dump the sensor in a glass of water which causes the alarm to trigger. To avoid the obnoxious noise we put an LED in place of the buzzer.
Please be aware: while talking about this circuit I said that the astable multivibrator “flip flops” between states. And that’s kind of true in one sense, but I should be clear than an astable multivibrator is not a “flip flop” circuit. A flip flop circuit is a different type of circuit known as a bistable multivibrator, which is a different kind of thing. In this experiment we use an astable multivibrator to generate a 1.62 kHz square wave which provides our tone, we do not use a flip flop or bistable multivibrator circuit.
We use the Rigol MSO5074 Mixed Signal Oscilloscope to measure and visualize the 1.62 kHz square wave which generates our tone.
We use the UNI-T UTi260B Thermal Imager to investigate the circuit thermals. We see that the 1K resistors in the astable multivibrator generate the most heat.
We use the Fluke 17B+ Digital Multimeter to measure the voltage across Q5. Between about 500 mV and 750 mV is enough voltage to enable the output.
We use the Riden RD6006 Bench Power Supply to deliver the 9V DC required for the project. We use the current measurement from the power supply to see that when the LED is active the circuit draws about 23 mA compared to about 11 mA when the LED is not active.
We use the Horusdy Soldering Station with Hot Air Gun to dry the sensor after it got wet.
Thanks very much for watching! And please remember to hit like and subscribe! :)

Following is a product I use picked at random from my collection which may appear in my videos. Clicking through on this to find and click on the green affiliate links before purchasing from eBay or AliExpress is a great way to support the channel at no cost to you. Thanks!
Ausum 25 In 1 Precision Screwdriver Set notes notes |
Let’s go shopping!
This post is part of my video blog and you can find more information about this video over here.
You can support this channel on Patreon: patreon.com/JohnElliotV
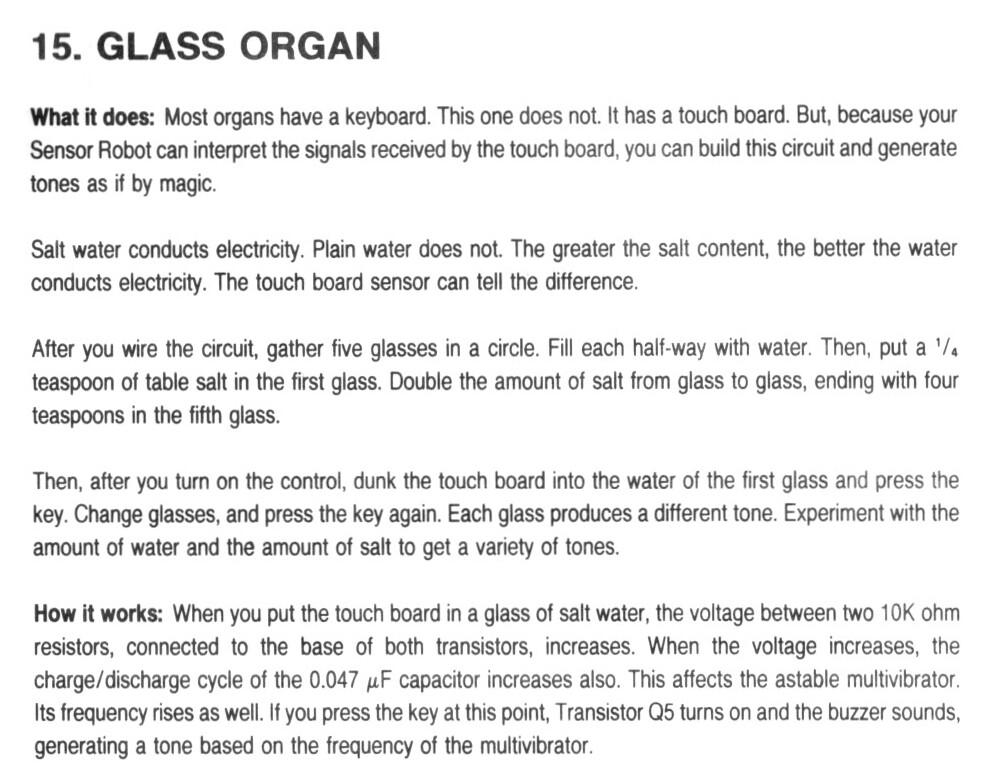
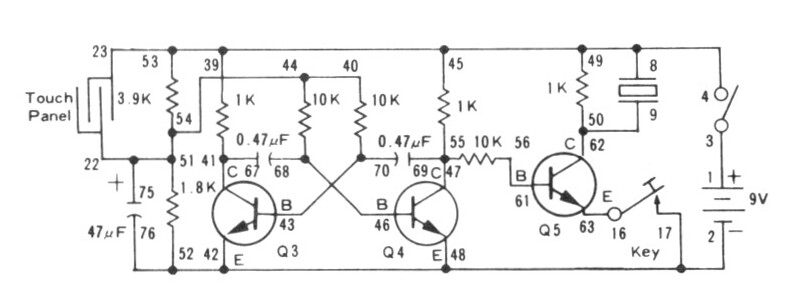
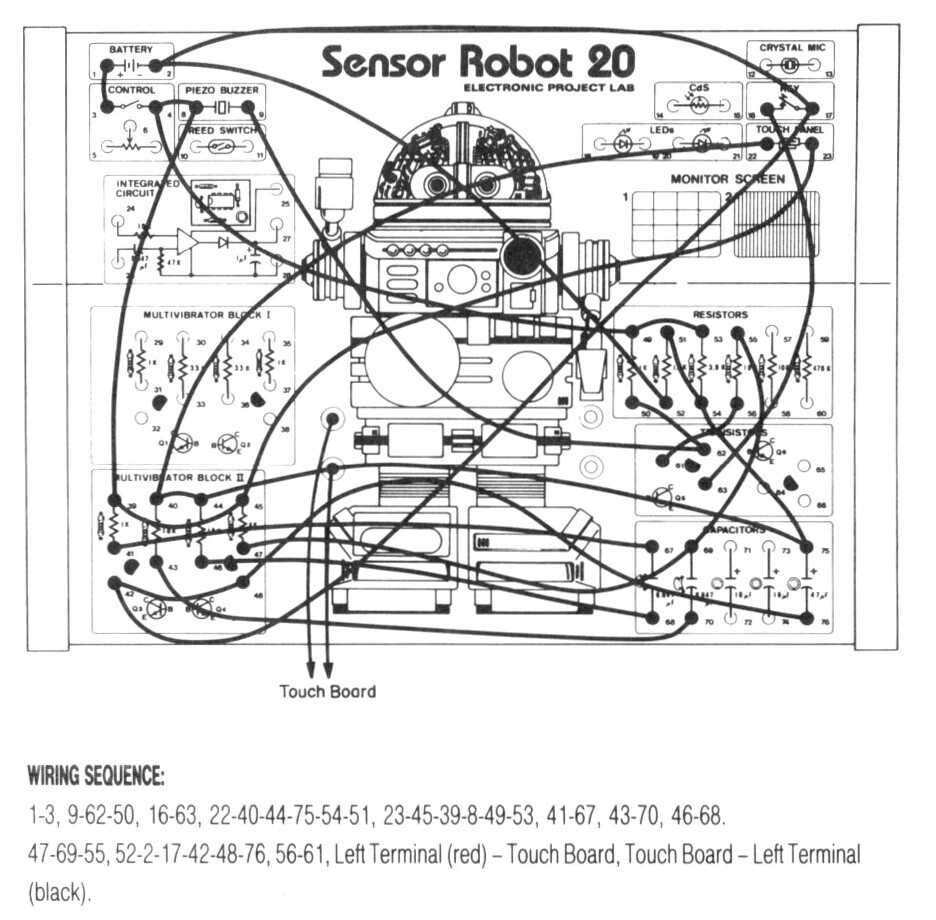
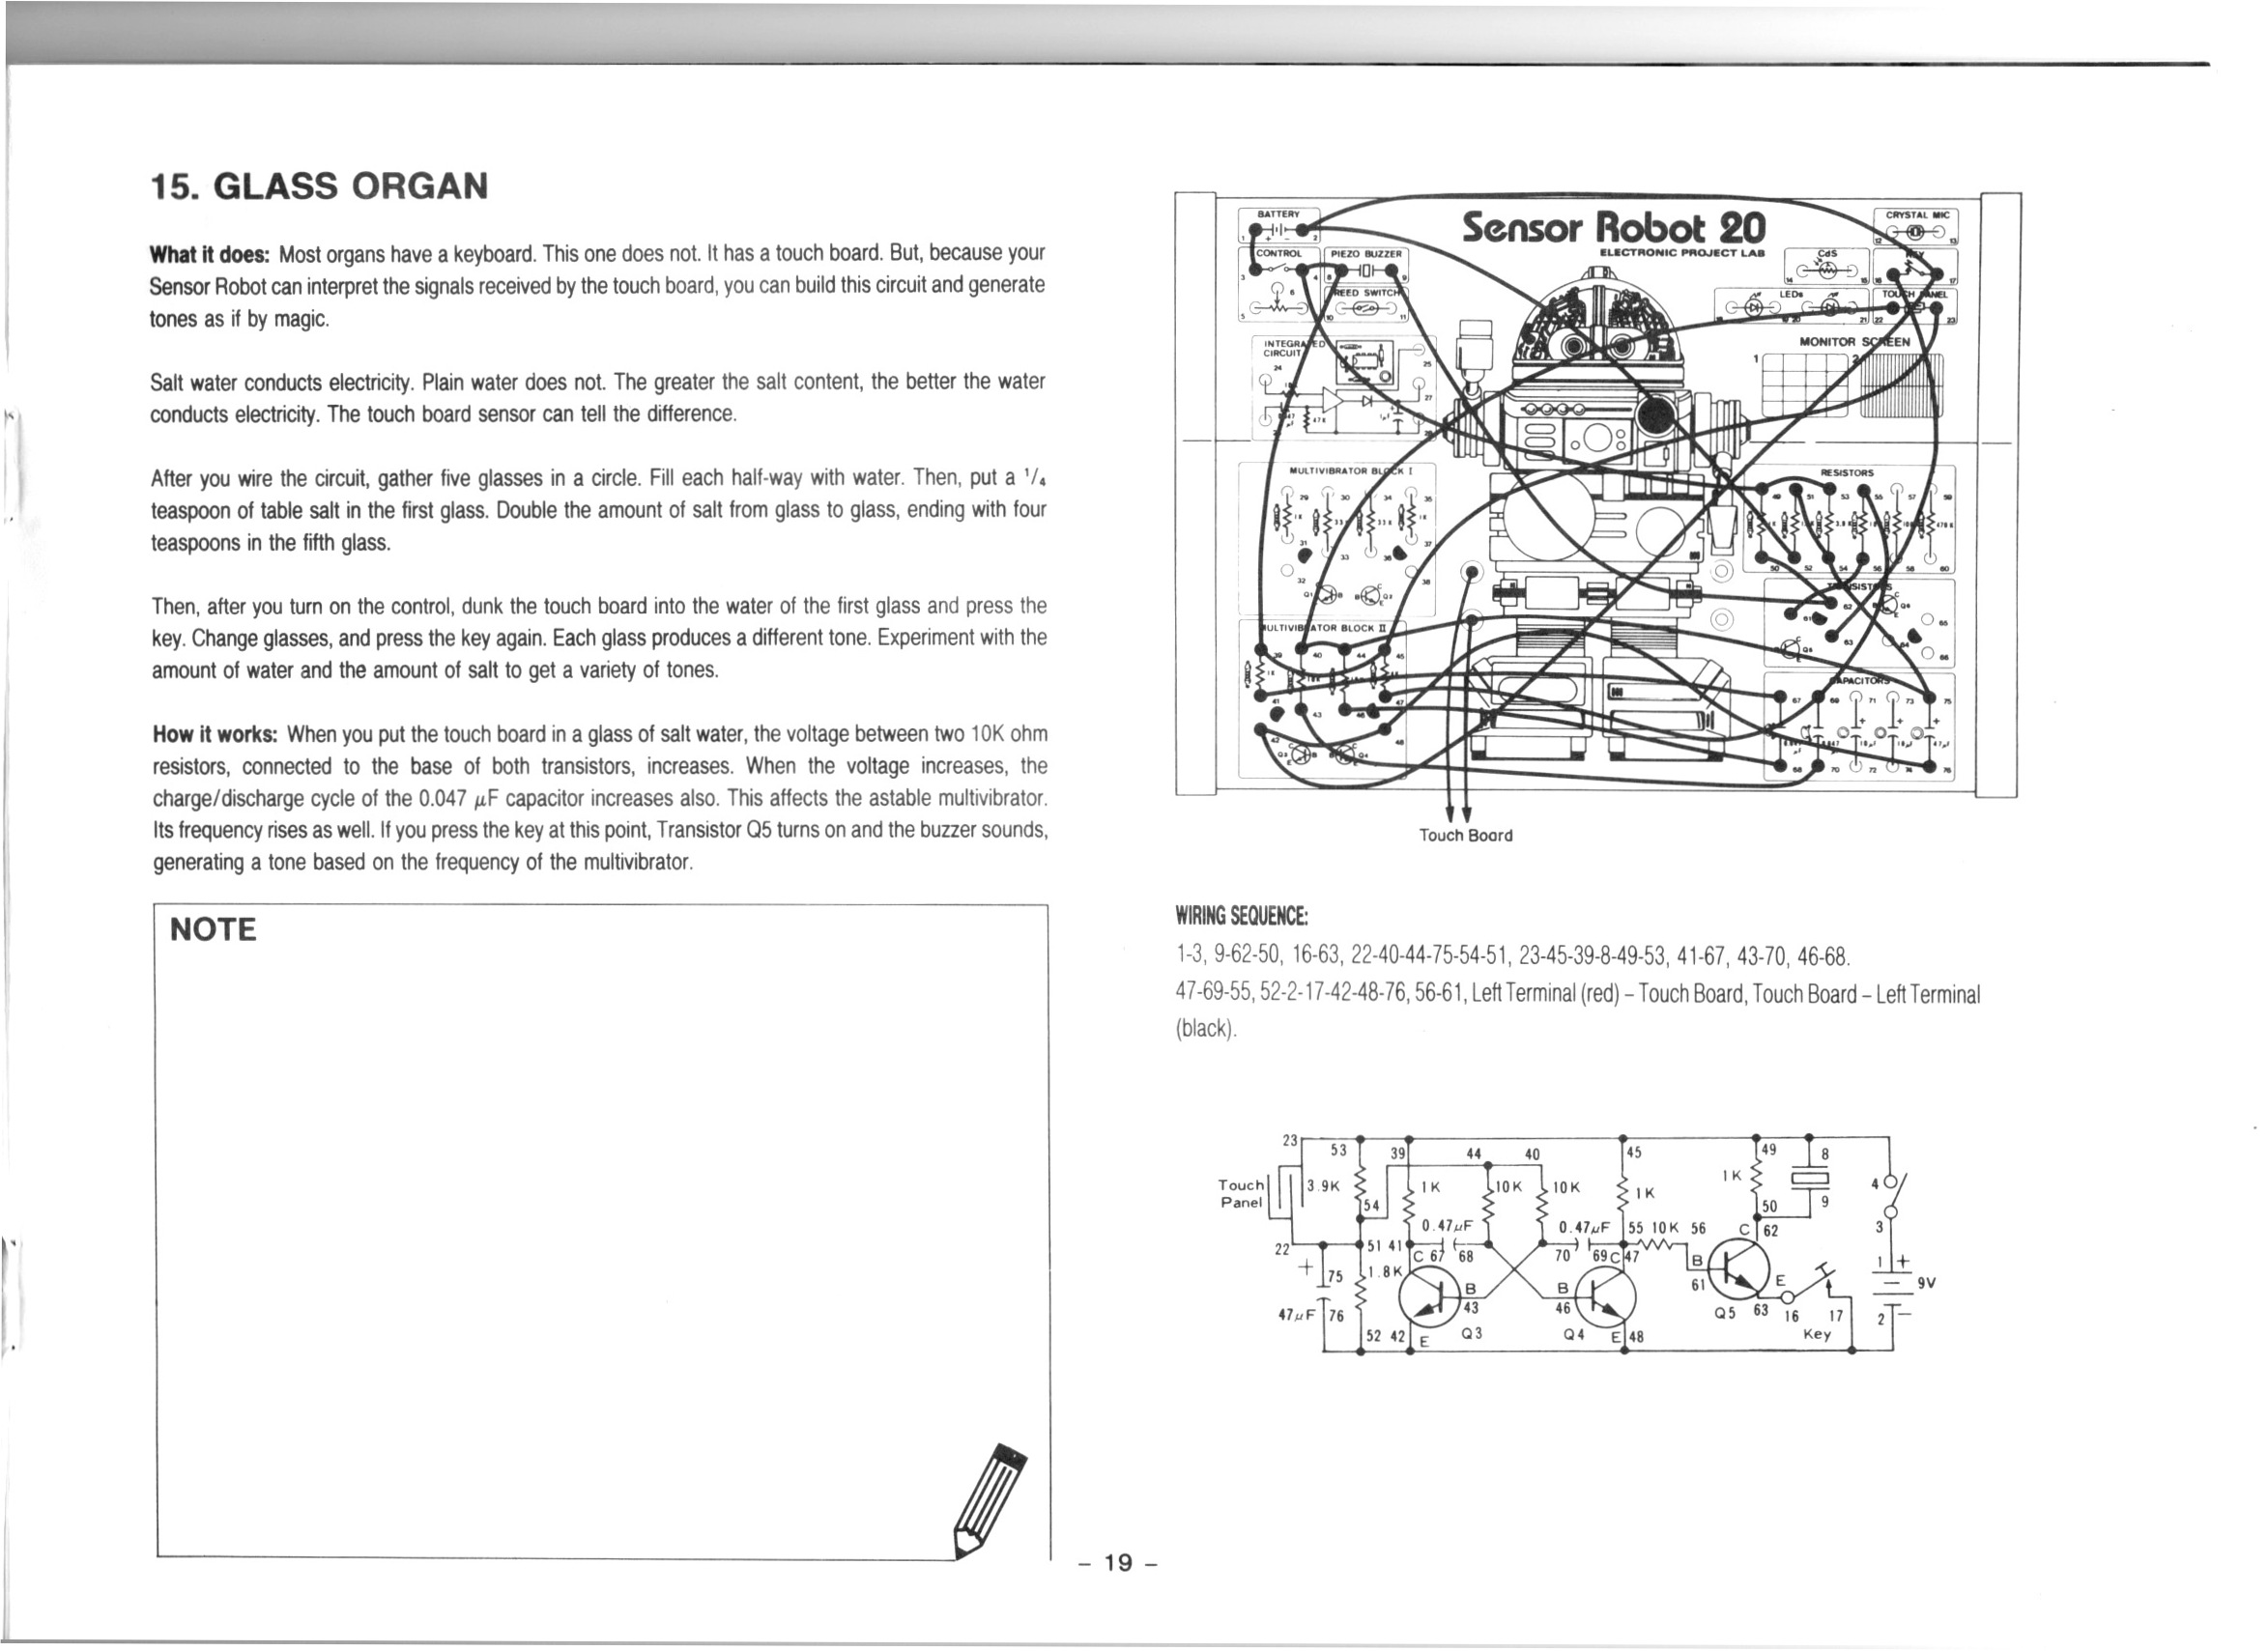
In this video we do the 15th project from the Maxitronix Sensor Robot 20 (20in1) Electronics Project Lab Kit: Glass Organ.
We had some trouble getting this circuit to work. It turned out that the instructions omitted one necessary wire. After we added that the circuit worked.
The salty water and the clean water didn’t have hugely different effects. It was hard to get a resistance reading because the resistances seemed to just continually increase. In the end I didn’t really understand that.
The products I purchase from AliExpress in the video are these:
We used the Rigol MSO5074 Mixed Signal Oscilloscope to inspect the output of the astable multivibrator.
We used the METCAL PS-900 Soldering Station to solder some jumpers onto a 10K potentiometer which we use to alter the frequency of the astable multivibrator.
We used the UNI-T UTi260B Thermal Imager to inspect the heat profile of the circuit. We see the resistors in the astable multivibrator get warm, along with other components.
We used the Fluke 17B+ Digital Multimeter to continuity test our point to point links, to test various resistances, to check for capacitance (there was none), and to measure the current draw. It was interesting to see the current draw increase with frequency.
We used the Riden RD6006 Bench Power Supply to provide 9V for the circuit. The RD6006 also reported current draw.
We used the Horusdy Soldering Station with Hot Air Gun. We used the hot air gun to shrink the heat shrink we used on the potentiometer jumpers.
We used the Brother P-Touch D210 Label Maker to label our salt jar.
The Goo & Adhesive Remover product I recommend is Goo Gone.
The cheap but excellent wire cutters I mention are these. I got a five pack for ten bucks.
Thanks very much for watching! And please remember to hit like and subscribe! :)
Following is a product I use picked at random from my collection which may appear in my videos. Clicking through on this to find and click on the green affiliate links before purchasing from eBay or AliExpress is a great way to support the channel at no cost to you. Thanks!
Fluke 17B+ Digital Multimeter |
Let’s go shopping!
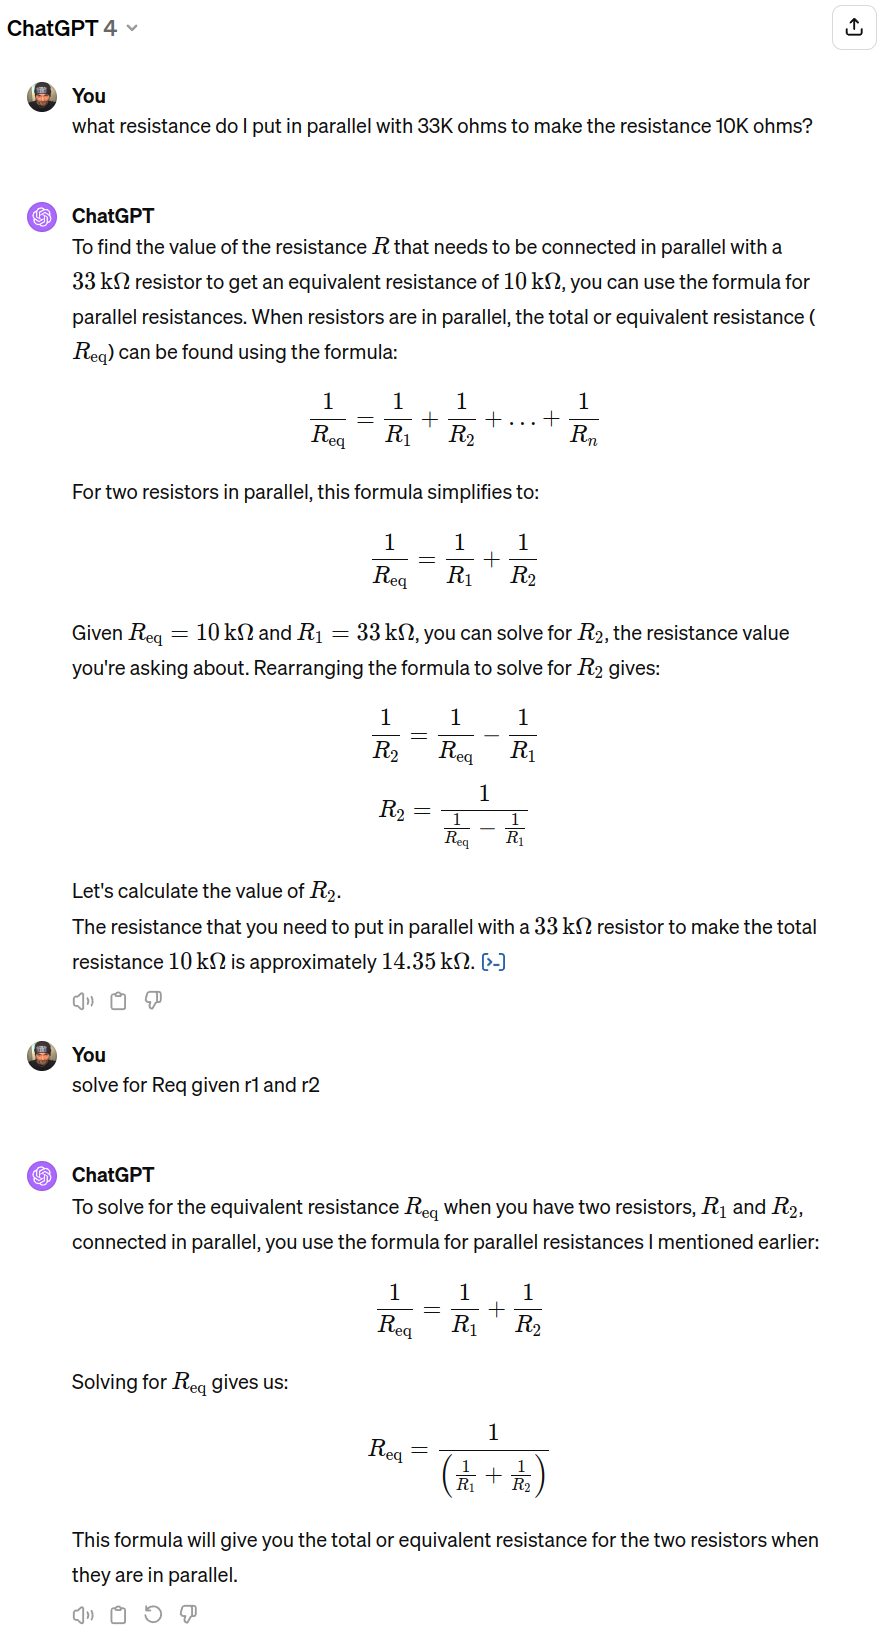
I just wanted this on record to show how insanely good ChatGPT4 is: