Learning the Art of Electronics: 1W.1 Designing an Ammeter | In The Lab With Jay Jay

You can support this channel on Patreon: patreon.com/JohnElliotV

This post is part of my video blog and you can find more information about this video.

Silly Job Title: Electronics Guy. I am the Electronics Guy!

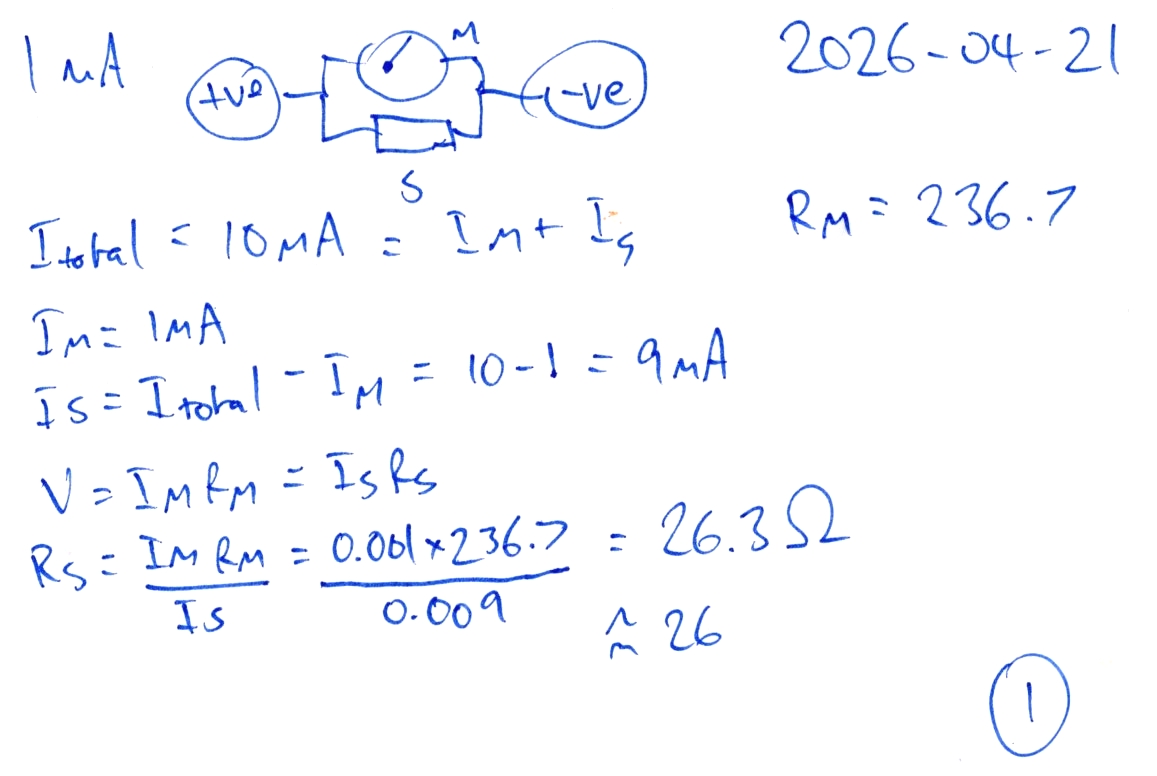
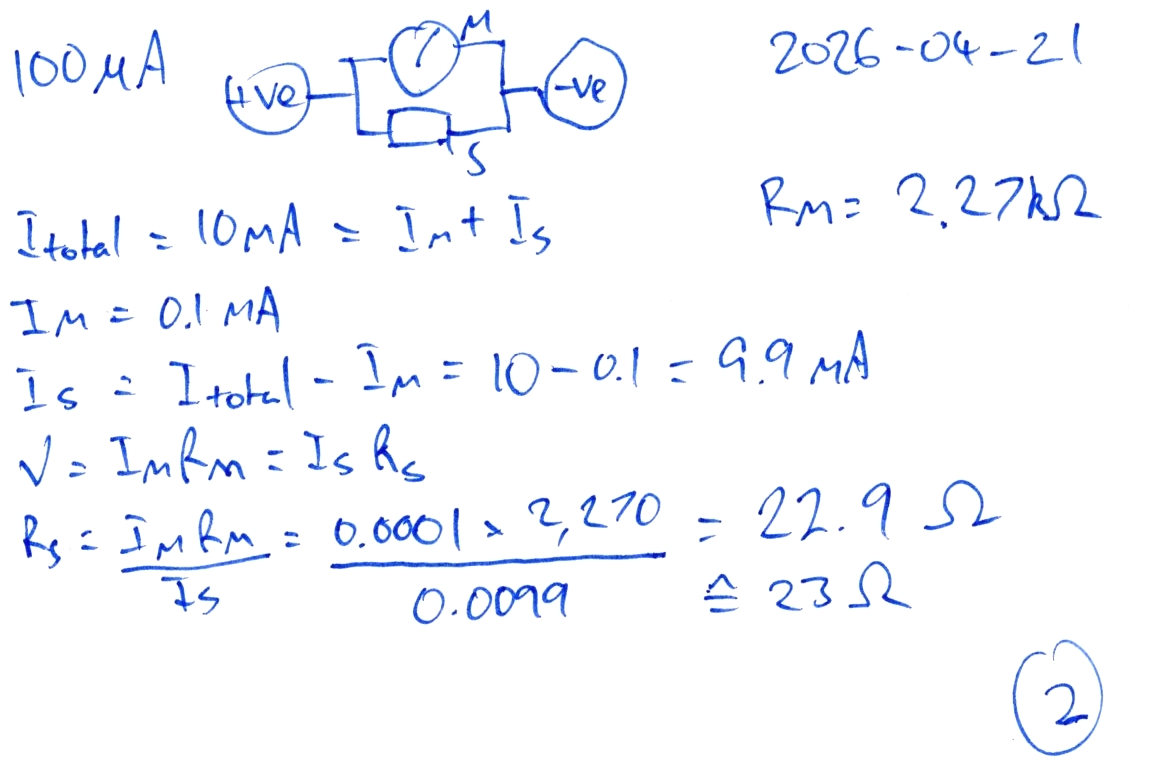
In this video we continue working our way through Learning the Art of Electronics and begin working through 1W Worked Examples: DC circuits. Particularly we design and implement the 1A ammeter. Next week we will do the voltmeter.

I measure the internal resistances of my various analog meters, which comes out like this:

Meter Resistance (Ω)
100 µA 2,271
1 mA 239
10 mA 27
100 mA 7
1 A 2
5 V 4,916
10 V 9,150
15 V 13,010

We use the METCAL PS-900 Soldering Station to solder our 222 mΩ resistor.

We use the AiXun H314 Hot Air Gun for the heat shrink.

We use the MUIN Solder Fume Extractor to clear the air.

We use the Riden RD6006 Bench Power Supply to provide test voltages and currents.

We use the EEVblog BM2257 Digital Multimeter to measure various things, particularly resistance.

We use the Sharp EL-546L Scientific Calculator to crunch a few numbers.

We use the Carpenter Mechanical Pencil to make notes.

We use the Hakko CHP 3C-SA Precision Tweezers for tweezering.

We use the Plato Model 170 Wire Cutter to trim component leads.

We use the Kaisi S-160 45x30cm Repair Mat as our workspace.

Thanks very much for watching! And please remember to hit like and subscribe! :)


Following is a product I use picked at random from my collection which may appear in my videos. Clicking through on this to find and click on the green affiliate links before purchasing from eBay or AliExpress is a great way to support the channel at no cost to you. Thanks!

MECHANIC UV Curing LightThis is an image of the product.notes

Let’s go shopping!

Learning the Art of Electronics: 1L.4.3 10 mA Ammeter Redux | In The Lab With Jay Jay

You can support this channel on Patreon: patreon.com/JohnElliotV

This post is part of my video blog and you can find more information about this video.

Silly Job Title: Electronics Guru. I am the Electronics Guru!

In this video we continue to work our way through Learning the Art of Electronics. In this video we return to 1L Lab: DC Circuits and revisit lab 1L.4.3 in which we made a 10 mA ammeter. This time around we do a better job of it, build two ammeters from different movements, and compare our results with an actual known-good ammeter.

As promised here are the notes:

We use the Tenma 72-10505 Bench Power Supply to provide 5 V for testing.

We use the EEVblog BM2257 Digital Multimeter to measure our resistor and as our reference ammeter.

We use the Sharp EL-546L Scientific Calculator to calculate our shunt resistance.

We use the Multicomp Pro MP701033 Resistor Decade Box as our shunt resistor.

We use the Kaisi S-160 45x30cm Repair Mat as our workspace.

Thanks very much for watching! And please remember to hit like and subscribe! :)

p.s. today I added mA to my spell check.


Following is a product I use picked at random from my collection which may appear in my videos. Clicking through on this to find and click on the green affiliate links before purchasing from eBay or AliExpress is a great way to support the channel at no cost to you. Thanks!

Yum Cha Universal Handheld Wire StripperThis is an image of the product.notes

Let’s go shopping!

Voltmeters and ammeters

In this photo we see three voltmeters (across the top) and five ammeters (across the bottom) attached to a voltage divider connected to a load.

30 V is applied then 2 mA flows through R1 and then splits with 1 mA going through R2 and 1 mA going through Rload. 20 V drops across R1 and there is 10 V across R2 and Rload.

Five ammeters and three voltmeters connected to a voltage divider attached to a load

The circuit on the left in the schematic below is the one being tested. In this case R1, R2, and Rload are all 10 kΩ. As R2 and Rload are connected in parallel their effective resistance is 5 kΩ. R1 being 10 kΩ gets two thirds of the voltage because R2 || Rload is 5 kΩ getting one third of the 30 V being 10 V.

The schematic of the voltage divider being tested

Learning the Art of Electronics: 1L.4.3 10 mA Ammeter | In The Lab With Jay Jay

You can support this channel on Patreon: patreon.com/JohnElliotV

This post is part of my video blog and you can find more information about this video.

Silly Job Title: Electron Herder. I am the Electron Herder!

In this video we continue to work our way through Learning the Art of Electronics. In this video we continue with 1L Lab: DC Circuits and make a 10 mA ammeter with our meter movement.

We use the 5V LED we made last weekend to test our ammeter.

We use the Riden RD6006 Bench Power Supply to power our test circuit.

We use the EEVblog BM2257 Digital Multimeter to measure the resistance of our 100 µA meter movement.

We use the Multicomp Pro MP701033 Resistor Decade Box for our 23Ω shunt resistor.

We use the Carpenter Mechanical Pencil to take notes.

We use the Kaisi S-160 45x30cm Repair Mat as our workspace.

Thanks very much for watching! And please remember to hit like and subscribe! :)

p.s. if you’d like to see the making of the 5V LED circuit we used to test our ammeter, that is here: Electronics Project #25: Variable Brightness LED for Testing Ammeter | In The Lab With Jay Jay.


Following is a product I use picked at random from my collection which may appear in my videos. Clicking through on this to find and click on the green affiliate links before purchasing from eBay or AliExpress is a great way to support the channel at no cost to you. Thanks!

DAZZLEEX 20pcs Precision Drill BitsThis is an image of the product.

Let’s go shopping!

Analog Meters for Learning the Art of Electronics

I was flipping through my copy of Learning the Art of Electronics: A Hands-On Lab Course (I have the first edition, this second edition comes out in Australia on 3 April 2025, I have a copy on pre-order, I think it’s already available in the USA) and I noticed that some analog meters are used in the first lab course.

So in preparation for doing that I purchased some analog meters, being these:

I am planning to start working through these projects on my YouTube channel @InTheLabWithJayJay at a rate of one project every 28 days starting April 1st. April 1st, being April Fools’ Day, is of course the traditional date for launching IT projects and it is also the one year anniversary of my video (which happens to be my most popular YouTube video by a large margin): New Book Teardown #3: Learning The Art of Electronics: A Hands-On Lab Course (2016) | In The Lab.