Learning the Art of Electronics: 1L.7 Oscilloscope and function generator | In The Lab With Jay Jay

You can support this channel on Patreon: patreon.com/JohnElliotV

This post is part of my video blog and you can find more information about this video.

Silly Job Title: Spark Slinger. I am the Spark Slinger!

In this video we continue to work our way through Learning the Art of Electronics. In this video we finish 1L Lab: DC Circuits by learning how to use our oscilloscope and function generator.

We use the Rigol MSO5074 Mixed Signal Oscilloscope as our oscilloscope and we use the UNI-T UTG962E Signal Generator as our function generator.

Thanks very much for watching! And please remember to hit like and subscribe! :)

p.s. today I added slinger to my spell check.


Following is a product I use picked at random from my collection which may appear in my videos. Clicking through on this to find and click on the green affiliate links before purchasing from eBay or AliExpress is a great way to support the channel at no cost to you. Thanks!

Yum Cha Razor BladesThis is an image of the product.

Let’s go shopping!

The Highs and Lows of Oscillation | Project 10/30 | Maxitronix 30in1 | In The Lab With Jay Jay

You can support this channel on Patreon: patreon.com/JohnElliotV

This post is part of my video blog and you can find more information about this video.

Silly Job Title: Volt Vanguard. I am the Volt Vanguard!

In this video we do the 10th project from the Maxitronix 30in1 Electronics Project Lab Kit: The Highs and Lows of Oscillation.

The spreadsheet with our measurements is here: Maxitronix-30in1-10.ods.

We use the Rigol MSO5074 Mixed Signal Oscilloscope to measure the period of our circuit’s oscillations.

We use the UNI-T UTi260B Thermal Imager to check the thermal properties of our circuit. There was nothing exciting to see.

We use the Carpenter Mechanical Pencil to take notes.

We use the Kaisi S-160 45x30cm Repair Mat as our workspace.

Thanks very much for watching! And please remember to hit like and subscribe! :)

p.s. today I added Rigol and Imager to my spell check.


Following is a product I use picked at random from my collection which may appear in my videos. Clicking through on this to find and click on the green affiliate links before purchasing from eBay or AliExpress is a great way to support the channel at no cost to you. Thanks!

Yum Cha CrowbarThis is an image of the product.

Let’s go shopping!

Learning the Art of Electronics: 1L.6 I versus V for some mystery boxes | In The Lab With Jay Jay

You can support this channel on Patreon: patreon.com/JohnElliotV

This post is part of my video blog and you can find more information about this video.

Silly Job Title: Code Warrior. I am the Code Warrior!

In this video we continue to work our way through Learning the Art of Electronics. In this video we continue with 1L Lab: DC Circuits and investigate two mystery boxes.

The values we measure in this video are available in this spreadsheet: LAoE-01L.6.ods.

We use the METCAL PS-900 Soldering Station for soldering.

We use the AiXun H314 Hot Air Gun for heat shrink.

We use the Riden RD6006 Bench Power Supply to provide test voltages of 0.1 V through 10 V.

We use the EEVblog BM2257 Digital Multimeter to measure current.

We use the EEVblog BM036 Digital Multimeter to measure current.

We use the Fluke 17B+ Digital Multimeter to measure voltage.

We use the Brother P-Touch D210 Label Maker to make labels.

We use the WilliamKlein Music Stand to hold the text book.

We use the Carpenter Mechanical Pencil to make notes.

We use the Hakko CHP 3C-SA Precision Tweezers for tweezering.

We use the Plato Model 170 Wire Cutter to cut, cut, cut.

We use the Kaisi S-160 45x30cm Repair Mat as our workspace.

Thanks very much for watching! And please remember to hit like and subscribe! :)

p.s. today I added to my spell check.


Following is a product I use picked at random from my collection which may appear in my videos. Clicking through on this to find and click on the green affiliate links before purchasing from eBay or AliExpress is a great way to support the channel at no cost to you. Thanks!

Yum Cha Corner CutterThis is an image of the product.

Let’s go shopping!

Learning the Art of Electronics: 1L.5 The Diode | Learning Electronics In The Lab With Jay Jay

You can support this channel on Patreon: patreon.com/JohnElliotV

This post is part of my video blog and you can find more information about this video.

Silly Job Title: Terminal Tactician. I am the Terminal Tactician!

In this video we continue to work our way through Learning the Art of Electronics. In this video we continue with 1L Lab: DC Circuits and test a 1N914 diode.

The circuit we build is this:

LAoE-Fig-1L.8 Diode VI measuring circuit.

And the charts we make are these:

LAoE-Fig-1L.9-linear Diode I versus V: linear plot.

LAoE-Fig-1L.9-lin-log Diode I versus V: lin-log plot.

This demonstrates that as we increase the voltage into our diode the current increases exponentially.

We reverse the polarity of the diode to see what happens and we observe that only a very small leakage current of 0.4 µA flows.

We use the Riden RD6006 Bench Power Supply to supply 5V for our test circuit.

We use the EEVblog BM2257 Digital Multimeter to measure voltage.

We use the Fluke 17B+ Digital Multimeter to measure current.

We use the Carpenter Mechanical Pencil to make notes.

We use the Kaisi S-160 45x30cm Repair Mat as our workspace.

Thanks very much for watching! And please remember to hit like and subscribe! :)

p.s. today I added Riden, EEVblog, Kaisi, and Multimeter, to my spell check.


Following is a product I use picked at random from my collection which may appear in my videos. Clicking through on this to find and click on the green affiliate links before purchasing from eBay or AliExpress is a great way to support the channel at no cost to you. Thanks!

Yum Cha 4K HDMI USB 3.0 HDMI To USB AdapterThis is an image of the product.

Let’s go shopping!

The “Secret Code” Key | Project 9/30 | Maxitronix 30in1 | In The Lab With Jay Jay

You can support this channel on Patreon: patreon.com/JohnElliotV

This post is part of my video blog and you can find more information about this video.

Silly Job Title: Earth Grounder. I am the Earth Grounder!

In this video we do the 9th project from the Maxitronix 30in1 Electronics Project Lab Kit: The “Secret Code” Key.

We use the Rigol MSO5074 Mixed Signal Oscilloscope to examine the buzzer tone signal.

We use the UNI-T UTi260B Thermal Imager to check thermals (there are none to speak of).

We use the Kaisi S-160 45x30cm Repair Mat as our workspace.

Thanks very much for watching! And please remember to hit like and subscribe! :)


Following is a product I use picked at random from my collection which may appear in my videos. Clicking through on this to find and click on the green affiliate links before purchasing from eBay or AliExpress is a great way to support the channel at no cost to you. Thanks!

Yum Cha Guitar String RulerThis is an image of the product.

Let’s go shopping!

Learning the Art of Electronics: 1L.4.3 10 mA Ammeter | In The Lab With Jay Jay

You can support this channel on Patreon: patreon.com/JohnElliotV

This post is part of my video blog and you can find more information about this video.

Silly Job Title: Electron Herder. I am the Electron Herder!

In this video we continue to work our way through Learning the Art of Electronics. In this video we continue with 1L Lab: DC Circuits and make a 10 mA ammeter with our meter movement.

We use the 5V LED we made last weekend to test our ammeter.

We use the Riden RD6006 Bench Power Supply to power our test circuit.

We use the EEVblog BM2257 Digital Multimeter to measure the resistance of our 100 µA meter movement.

We use the Multicomp Pro MP701033 Resistor Decade Box for our 23Ω shunt resistor.

We use the Carpenter Mechanical Pencil to take notes.

We use the Kaisi S-160 45x30cm Repair Mat as our workspace.

Thanks very much for watching! And please remember to hit like and subscribe! :)

p.s. if you’d like to see the making of the 5V LED circuit we used to test our ammeter, that is here: Electronics Project #25: Variable Brightness LED for Testing Ammeter | In The Lab With Jay Jay.


Following is a product I use picked at random from my collection which may appear in my videos. Clicking through on this to find and click on the green affiliate links before purchasing from eBay or AliExpress is a great way to support the channel at no cost to you. Thanks!

DAZZLEEX 20pcs Precision Drill BitsThis is an image of the product.

Let’s go shopping!

Electronics Project #25: Variable Brightness LED for Testing Ammeter | In The Lab With Jay Jay

You can support this channel on Patreon: patreon.com/JohnElliotV

This post is part of my video blog and you can find more information about this video.

Silly Job Title: Current Conjurer. I am the Current Conjurer!

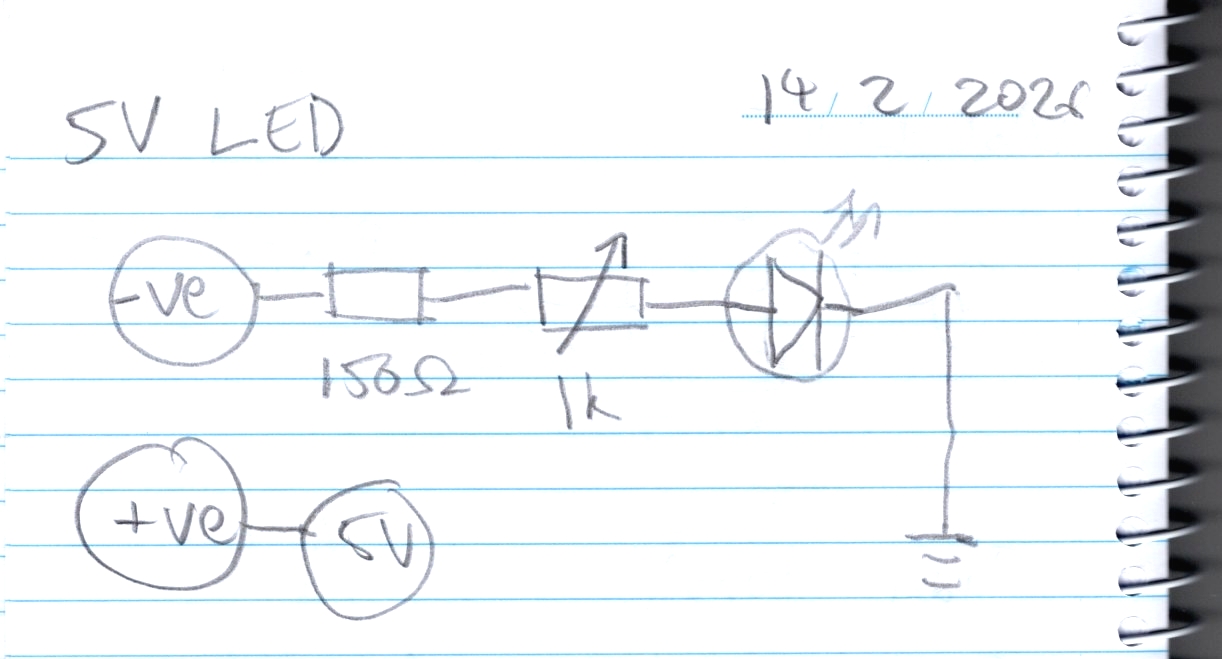
In this video we build a variable brightness LED for use as a circuit for testing an ammeter which we will be making next week as we continue through Learning the Art of Electronics. This circuit will draw between 3 and 18 mA which should meet our requirements.

(Update: the project where we use our variable brightness LED is now available online. Check it out if you’d like to see how we put this circuit to use: Learning the Art of Electronics: 1L.4.3 10 mA Ammeter | In The Lab With Jay Jay.)

This humble build shows how to make a simple circuit from components connected to each other with DuPont cables, no circuit board required. Using the DuPont cables allows us to make the circuit in the air first for assembly and testing then allowing it to be installed in the project box piece by piece after it has been tested.

During testing we discover a problem whereby the circuit doesn’t power on. Investigation with the voltmeter indicates the problem is in the wiring of the DC barrel power socket. Once that gets fixed the circuit works and is ready for installation.

The convention I used to help me remember what connects to what is that a male DuPont connection is for an output and a female DuPont connection is for an input; things which connect to each other will preferably have the same colour wire.

After testing I use heat shrink around the various leads and wires. I also use a number of different sizes of drill bit in order to make the holes in the project box for the DC barrel power in, LED, potentiometer, and banana sockets.

The DC barrel power in, potentiometer, and banana sockets are bolted in with washers and nuts, whereas the LED is held in place with hot glue. If I need to remove the LED in future isopropyl alcohol is the antidote for hot glue.

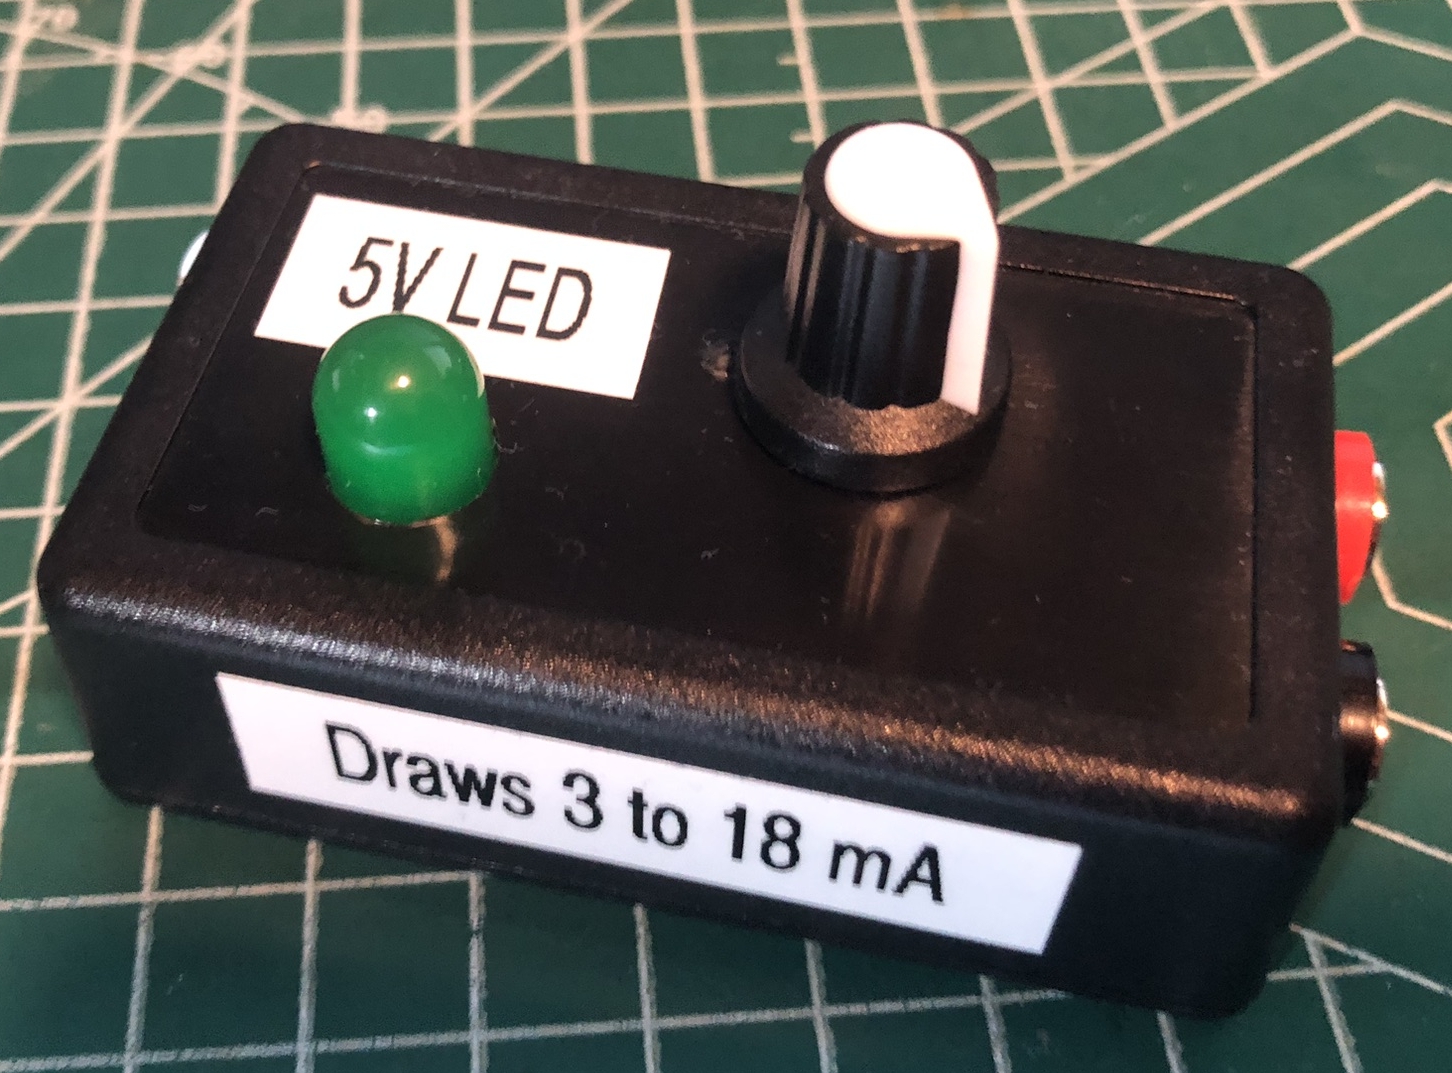
I labeled the box as “5V LED”, which should help me remember what this thing does so I can use it again in the future, should I find myself needing to draw a few milliamps in a pinch.

The circuit diagram looks something like this:

The schematic from my notebook

And the finished product looks something like this:

The project assembled in its box

We use the METCAL PS-900 Soldering Station for soldering.

We use the AiXun H314 Hot Air Gun for shrinking our heat shrink.

We use the Riden RD6006 Bench Power Supply for supplying voltage for testing.

We use the EEVblog BM2257 Digital Multimeter to measure voltage.

We use the Fluke 17B+ Digital Multimeter to measure voltage and current.

We use the Brother P-Touch D210 Label Maker to label our project.

We use the Carpenter Mechanical Pencil to make notes.

We use the Hakko CHP 3C-SA Precision Tweezers for tweezering.

We use the Plato Model 170 Wire Cutter for cutting.

We use the Kaisi S-160 45x30cm Repair Mat as our workspace.

Thanks very much for watching! And please remember to hit like and subscribe! :)

p.s. today I added potentiometer, isopropyl, milliamps, multimeter, and tweezering to my spell check.


Following is a product I use picked at random from my collection which may appear in my videos. Clicking through on this to find and click on the green affiliate links before purchasing from eBay or AliExpress is a great way to support the channel at no cost to you. Thanks!

Yum Cha Drill ExtensionThis is an image of the product.

Let’s go shopping!

Old Book Teardown #23: Engineering Electronics with Industrial Applications and Control (1957)

You can support this channel on Patreon: patreon.com/JohnElliotV

This post is part of my video blog and you can find more information about this video.

Silly Job Title: Circuit Breaker. I am the Circuit Breaker!

This video is part of the Old Book Teardown feature of my video blog.

In this video I tear down Engineering Electronics with Industrial Applications and Control by John D. Ryder. This book was published in the USA in 1957. The book comprises 666 pages and is chock full of schematics with old vacuum tubes and photos from old Cathode Ray Oscilloscopes (CROs).

This whole thing is a duplicate, because I already had a look at this back in April 27, 2024. Oh well. Practice makes perfect. :)

In the video I mention about PID controller.

Thanks very much for watching! And please remember to hit like and subscribe! :)


Following is a product I use picked at random from my collection which may appear in my videos. Clicking through on this to find and click on the green affiliate links before purchasing from eBay or AliExpress is a great way to support the channel at no cost to you. Thanks!

Yum Cha Double-Headed Rubber HammerThis is an image of the product.

Let’s go shopping!

Mail Call #54: Eve Meter, Science Books, STM32, Breadboard Base, and More! | In The Lab

You can support this channel on Patreon: patreon.com/JohnElliotV

This post is part of my video blog and you can find more information about this video.

Silly Job Title: Craig Entertainer. I am the Craig Entertainer!

In this video we take a look at what came in the mail:

Thanks very much for watching! And please remember to hit like and subscribe! :)


Following is a product I use picked at random from my collection which may appear in my videos. Clicking through on this to find and click on the green affiliate links before purchasing from eBay or AliExpress is a great way to support the channel at no cost to you. Thanks!

Yum Cha Whiteboard NotebookThis is an image of the product.

Let’s go shopping!